How to Ensure Your Assets are Installed to Prevent Premature Failure
 How many times has an asset been installed or commissioned, only to have it fail in a few days or months when it should have lasted even longer? If you look at the study by Nowlan & Heap, they have found that only 11% of failures are age related, so when is happening with these assets? The answer… comes down to poor installation practices.
There have been a few studies or figures around the impact of poor installation practices and the failures that result. Based on our experience and the experience of our partners, we have determined that up to 65% of failures can be traced back to the improper installation. Of these failures, 36% can be traced back to misalignment and soft foot conditions. It would seem that a little upfront work on proper machinery alignment would go a long way to improving asset reliability. Before the alignment can be done properly, the issues that are being addressed should first be understood.
What is Misalignment?
The condition when the centerlines of two co-axial shafts don’t form a straight line. Misalignment can reduce bearing life, reduce coupling life, increase vibration levels, and reduce seal life. Misalignment must be addressed in two planes, horizontal and vertical. Within each of these planes, there are two primary types of misalignment; Angular misalignment and Offset misalignment. Angular misalignment indicates that the face of the shafts or couplings is not at right angles to each other or parallel to each out. Horizontal angular misalignment is best corrected with jack screws or alignment screws to push the asset into alignment, with the front or back of the asset being adjusted at different measurements. Vertical angular misalignment is corrected with the use of shims to lift and level the asset, with different amounts of shims being used at the front or back. Offset misalignment indicates that the centerlines are parallel, but not in line. Horizontal offset is best corrected by using jack screws to push the asset from side to side, but both the front and back of the asset should have the same amount of adjustment performed. Vertical offset misalignment is corrected with equal amounts of shims under all feet of the asset. In most installations, there is a combination of Angular and Offset misalignment present.
What is Softfoot?
Occurs when all supporting members of the asset do not equally support the asset. In a soft foot condition, the asset does not sit firmly on all supports. Soft foot is often a major cause of the misalignment. Soft foot can also cause stress to the machine housing and distort the bearing bores to oval. Soft foot can be caused by numerous issues such as poorly machine supports, dirt or paint under the asset or on the supports, anchor bolts incorrectly torqued during grouting, poor base plate design, poor leveling, grout deterioration and settling, and corrosion of the base or foot of the asset. There are two primary types of soft foot that are encountered; Ordinary soft foot and Angular soft foot. The ordinary soft foot is the amount of even gap between one foot of the asset and the base plate. Angular soft foot is the angular or irregular uneven gap between an asset support and the base plate
7 Steps to a Proper Machinery Alignment
- Pre-Alignment
- Gather all applicable tools, such as wrenches, feeler gauges, your favorite Easy Laser system, or dial indicators and consumables such as shims and prepare for the upcoming alignment job.
- Research all of the required specifications, or technical specifications, such as the appropriate specifications that the equipment should be aligned to be based on the RPM of the equipment, and any thermal growth issues.
2. Safety & Work Area Preparation
- Lock-Out/Tag Out the asset. Also, make sure any surrounding equipment that could cause a safety hazard is LOTO as well.
- Clean up any corrosion or debris around the equipment that will be aligned. This will ensure a proper visual inspection can take place, and that there will be minimal interference from debris during the alignment process.
- Perform a visual inspection of the equipment bases, grout, foundation and mounting bolts. If any of the components appear to be damaged or worn, they must be repaired/replaced before moving forward with the alignment.
- Check for Mechanical Looseness in the system. If any looseness exists, the equipment should be repaired before moving on to alignment.
- Replace damaged shims if this is not a new installation. Don’t jeopardize the asset reliability for a few dollars in shims.
3. Measure
- Correct for any thermal growth. This may be done through manual calculations or by entering the offset into the Easy Laser equipment.
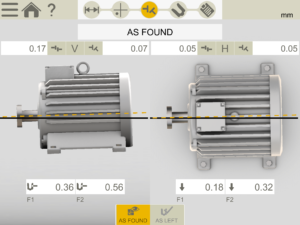
- As-Found measurements should be taken for an existing installation. This will be used to compare the before and after.
- Measure & correct machine stress such as pipe stress, and deformed machine bases. This may require additional work such as repairing the base plates or correcting pipework. While this work can add to the job significantly, it will make the alignment process easier, and reduce the likelihood of premature failure.
- Check for soft foot using either feeler gauges or your Easy Laser system. Softfoot must be corrected before a meaningful alignment can take place. Softfoot must be corrected to < 0.05mm.
4. Align
- Using a minimum of 2 measurement points (if using an Easy Laser system, more will be required if using dial indicators), take readings to understand the current angular and offset misalignment.
- Make minor adjustments to correct the offsets. Depending on the RPM of the equipment, the acceptable alignment tolerance
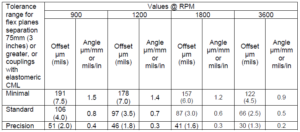 s will vary.
5. Final Softfoot Check & Alignment
- Once everything appears ok, tighten all bolts to the proper torque specification.
- Perform a final soft foot and alignment check. This will ensure that nothing moved during the bolt tightening.
6. Document
- Documentation is critical in every aspect of the machinery installation process. All installation activities should be documented as it allows for Acceptance Testing, Verification and assists in root cause analysis. Documentation should collect enough of the right data while minimizing unnecessary information.
7. Acceptance & Verification
- Acceptance Testing to Standards, regardless of who performs the machinery installation, there should be a 3rd party validation of the installation. This does not have to be a specialized contractor but could be an internal tradesman validating the work of a contractor, or another internal employee. The goal here is not to be punitive, but to ensure that all standards are met, and if not, learn why not and improve the process in the future.
- Verification after Break-in/Run in is required even if there was an acceptance test performed, the equipment installation needs to be verified after it has had time to start, run and stop. Any defects in the installation process can be caught at this point, which is still very early on the I-PF curve and corrected to prevent premature failures. This process is very similar to the Acceptance Testing, as the installation is verified against both the standard and the As-Left measurements. Also, various CBM technologies can be used as an additional method to verify the proper installation. For example, ultrasound or vibration can be used to verify that the machinery was aligned properly.
How many of you have a robust alignment procedure that covers all of the points listed above? Does your organization recognize the importance of proper machinery alignment? If you are looking for assistance in developing a robust alignment program, or are looking for quality laser alignment equipment such as the award winning Easy Laser XT440, please contact [email protected], or visit our store.
Remember, to find success; you must first solve the problem, then achieve the implementation of the solution, and finally sustain winning results.
I’m James Kovacevic
Eruditio, LLC
Where Education Meets Application
Follow @EruditioLLC
References;
